Sunday, May 29, 2011

Humming Bird Thread Painting Tutorial--Updated!

There have been several requests on how I thread paint.  I'm still a beginner and learning.  You have an advantage--you can see my mistakes and avoid them. 
Update:  I've been working on more thread painting and decided to update this post.


I first trace my picture with a fine point pigma pen on water soluble stabilizer from Superior Threads.  When storing this stabilizer, I store it in an airtight container or plastic bag because our humidity is so high.
This time I used Aquamesh, which is a wash away embroidery stabilizer.  This is just a little heavier and some people may like it better than the plastic type stabilizer.


 I lightly sprayed basting spray on my fabric on the right side and placed my bird picture on top.  I also used two sheets of tear-away stabilizer underneath my fabric.  The basting spray was used very sparingly on the tear away.
This time I sprayed on the wrong side of my bird picture and laid it on my fabric.


  I did use four quilting pins in the corners to make sure everything stayed in place.  Forty weight machine embroidery thread was used for the top thread.  The thread in the bobbin is a thinner thread that is made for machine embroidery.  You can buy it on a spool or on prewound bobbins.  I prefer using the bobbins that come with my machine and I think that the prewound bobbins are wound too tight for it to smoothly come off the bobbin.  I had a few prewound bobbins that were given to me by a professional embroidery business that I rewound.  Before I started coloring in my picture, I bring my bobbin thread up to the top.


Since I've been free motion quilting, I thought that I wouldn't put my fabric in a hoop.  Study your picture of your bird and look for colors that are in your bird and start coloring your picture in.  I used both a straight stitch and a very narrow zigzag depending on what look I wanted.  When you use the zigzag please be careful that it's not too wide that your needle will hit your darning foot.


I used a little bit of blue to shade is his head.  Once I shaded in his head, you hardly see the blue, but the highlights are still there.  The secret is shading in with several different shades of thread.  Really look hard at your picture to see what colors are on your bird.  I use a back and forth motion to color in my bird.  If you have never seen an embroidery machine sew out a picture, I would highly advise that you watch one in action.  You will understand how thread painting works.
Thread is very expensive and there is no way I could afford these spools brand new.  My secret is out--watch Ebay for a deal.  I ran across someone that wanted to get rid of her extra machine embroidery thread.  Shop around and know your prices.  The two main brands of thread I used were Isacord and Madeira poly neon.  I chose polyester over rayon because of strength.  Rayon does look beautiful, but right now I'm just in the experimenting stage and  I have plenty of thread to practice with.


After I'm done thread painting, I remove the water soluble stabilizer by tearing it away and misting a little water on spots that I can't get to.
There is a reason that people use hoops for their embroidery!  When there is heavy stitching, the fabric draws up and puckers like.  I did do some ironing and it helped out a lot.  Just make sure that your iron isn't too hot because I think it could melt your polyester thread.
I removed the tear away being careful not to cut my fabric.  I'm not sure if it was a good idea to use the basting glue--I thought it might stop the puckers!  The basting glue worked so well that I was afraid that I might accidentally cut my fabric!
I do not have a picture of it, but I put two layers of Warm and Natural batting underneath my picture.  Below I am sewing around my picture with invisible thread.
This time instead of using invisible thread I used Vanish thread.  This thread is wash away!  Please don't get it mixed in with your other thread or you could be in for a big surprise when your quilted item is washed!
I'm not sure if I like the invisible thread or the Vanish thread--I'm just experimenting.


Then I cut the excess of batting away.  This is called machine trapunto, which I learn this technique from Patsy Thompson.  The main reason why I did this technique was to take up the fullness so I wouldn't have any puckers and it worked!


I sandwiched my quilt together with my favorite basting spray and a few safety pins.  Now I'm ready to quilt!


As I experiment with this new adventure, I will let you know what I have learned.
I'm still learning!  
I want to thank Vic Murayma  letting me use a picture of his humming bird.  Please check out his pictures of birds--they are absolutely amazing pictures!

Happy Quilting!

Kay Lynne

Friday, May 27, 2011

May Giveaway Day Winner & Hail on the Farm

We have a winner from my random number generator, my husband picking a number while raking leaves.  He picked the #52, which is Stephanie of Black Coffee Quilts.  Congratulations Stephanie!
Did you catch what I said?  Dean was raking leaves off our driveway because it hailed Wednesday.


Our hail was small compared to the hail a few miles from our home.  Other people had golf ball sized hail.


 This was one time I was really scared during the storm.  My son, a flight dispatcher, has always told me that "Hail=Tornado Warning".  We did not have a tornado, but the hail sure made me worry about having one.


Still with all the turmoil we need to see the blessings in the grass.  
If you click on the picture below, look close and you will see a baby fawn that had gotten caught in the storm.  I am sure that the mother deer found her because this was the only time we seen it.


 We had some damage to our wheat, but it's not a total loss.


We usually harvest wheat in early July and June is the month that the grain heads fill out.  The bent heads will probably not fill out because the plant is damaged.  We have hail insurance, but it won't cover the whole loss, but that's farming.  Our corn is still small and will grow back.


We also had a lot of rain and there are a lot of fields under water, but it will eventually dry off.


Things always seem to work out.

Please keep those who are suffering weather disasters around the world in your thoughts.  Our cousins in Joplin, Missouri are alive and safe.  It was such a joy Monday when I received an email that they were alright and their house was still there!

Happy Quilting

Kay Lynne

P.S.  I will be posting a Thread Painting Tutorial on Sunday :)

Saturday, May 14, 2011

A New Adventure: Thread Painting & We're Planting!


Since I made the Pansy Wall hanging, I have wanted to try thread painting.  I tried it many years ago and it was a complete disaster because I used regular sewing thread and I didn't know what stabilizer was.  It makes all the difference in the world when you use the right thread and stabilizer.  I used Isacord and Coat's & Clark's  machine embroidery thread.


I worked off a picture that I clipped out of a magazine that I really liked.


Here is a practice feather and background that I used for on the back.  It was a fun project and now I know that I really like thread painting! 

We've been blessed with a few short days to do some planting.  During the rush time my son had a flat tire on the big tractor.


We were so happy that Ron stayed to help Dad out on the farm.


After a few hours, Ron was up and working ground ahead of Dean.  The next day I came home from work at noon and by 2:00 p.m. I was working ground until 7:00 p.m.  Then I baked pies for church.    It was a really long week!


 So far we only had a flat tire and that isn't considered a major breakdown.  Dean kept on planting while Ron bought a new tire.


Here's a beautiful sunset from a few days ago.


I know the picture is a little blurred, but it's still a part of our farming story.


Don't forget to see my quilt for the Blogger's Quilt Festival.

Happy Quilting!

Kay Lynne

Blogger's Quilt Festival May 2011


I'm excited--there is a quilt show that you can see no matter where you are!  Amy's Creative Side is hosting the event.  If you have a quilt you want to share, please post it before May 20. 2011.
This quilt was made about five years ago for my youngest son.  I thought I had enough fabric at the time in my fabric stash to make this quilt and to my disbelief I was short just a few blocks.


 So what do you do when you get yourself into trouble?  Ask mom!  I took my blocks and showed her my problem.  Her solution was so simple.  She machine embroidered the blocks that I needed.  She even matched the colors in the print of the fabric.


I even ended up with a few extra blocks that I added to the backing making a reversible more retro type quilt.


Hope you are enjoying the Quilt Festival!


Thank you Amy for the

Sunday, May 8, 2011

Pansy Wall Hanging and More

A few weeks ago my mom and I had the pleasure of taking a class from Patsy Thompson.
Her quilts are really neat to see on her blog, but the pictures on internet are no way near the pleasure of seeing them up close in person.  I learned many new techniques like thread painting.  Thread painting is something completely new to me, but it's a lot of fun.  I see more thread painting in my future.


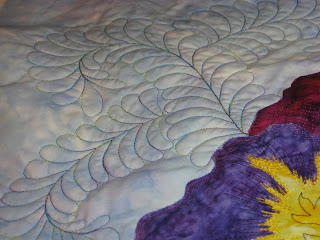
I wasn't quite sure how I was going to quilt this wall hanging and decided to try to quilt feathers around my pansy flower.  Below is a practice feather using Highlights 40 weight polyester thread from Superior Threads.


I also tried a different background filler that goes with feathers, but fades into the background with the white thread I used.  Patsy does a similar background design in her pansy quilt. 


I added the feathers one curve at a time until I was happy with what I was looking at.


I did echo quilt around all the feathers to highlight them a little more.   Thank you Patsy for a wonderful class I had a great time and learned a lot.  I hope to have the pleasure of taking another class from you in the future.  Please check out Patsy's Home Page, there are many things there for you to explore!


Last Sunday afternoon I enjoyed a trip to Sauder's Museum.  Below is a picture of my sister, Jenny, with a quilt that I helped her with many years ago.


 Here is my Mom and her quilt, Diamonds Jubilee.  It was a fun day with family and friends.  Check out my sister's blog for two other quilts that were in the show.


Happy Mother's Day Mom!
I owe you "sew" much!

Happy Quilting!

Kay Lynne

Sunday, May 1, 2011

Cincinnati International Quilt Festival (Part 2)


I had another opportunity to meet a fascinating quilter, Deborah Kemball.  She loves floral applique.  We had a brief, but very enjoyable conversation on the construction of her quilt.  I can't imagine how many hours went into this beauty; it is truly a work of art!  


Deborah also called to my attention another quilt that she had displayed at the show.
The beautiful colors of this quilt caught my eye right away.


Be sure to check out Deborah's web site--she is also an author of  Beautiful Botanicals if you are interested in creating these beautiful flowers yourself.


Thank you so much Deborah letting me share your quilt with us.
 

Happy Quilting!

Kay Lynne